Learn at Home Activities for Spelling
Concept of Beginning, Middle and End
It is VERY important for students to understand the concept of beginning, middle and end. This can be tricky because there are other words we use synonymously (for example, first, last, start). To start, use a visual with a clear beginning, middle and end such as the train and three-space visual provided on Day 2 of the ‘Build Your Home Learning Kit’ series. Teach the vocabulary without introducing sounds at all. Have your child put their favourite toy figurine, a block or a poker chip on the first train car, last train car, middle train car etc. See video example below. Allow sufficient practice and then continue to use the train visual to practice identifying the beginning sound in words, then the end sounds and then the middle sounds. Fade the train prompt but continue to use the three-space visual provided.
Phoneme Segmenting
Practice segmenting words into individual sounds. Show a picture of a CVC word (consonant-vowel-consonant such as cat, bed, hot) and say the word aloud. Use an elastic band, stretchy shoelace, or stretchy snake and slowly stretch it out while saying each sound in the word. As the object returns to its original length, quickly blend the sounds together to say the word. Have your child imitate or do it with you. Some children like holding one end of the toy and stretching it together. Alternatively, use arms to stretch out further and further as you say each phoneme or to touch as they say the beginning, middle and end sounds. See examples in these YouTube videos:
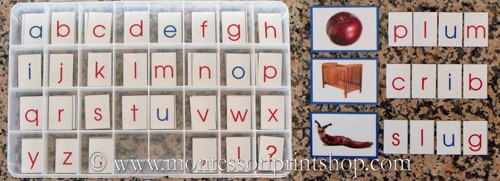
Use a movable alphabet
This is any form of letters that your child can select to spell words so that they are not burdened by the additional task of forming the letters.

Provide a visual of the word your child is spelling
Because auditory information is temporary unless it is remembered, give your child a picture of the word you want them to spell. This way, they do not have the additional burden of remembering the word as they are trying to spell and can look at the picture for a reminder. We have provided this digital version of the picture cards we use, with the option of printing them for home use as well.
Provide visual placeholders showing the number of sounds in the word
This will help your child see how many sounds they should be listening for and know that they have identified all the sounds when all of the places are filled with letters. Having the moveable alphabet and this visual colour coded so that vowels are red and consonants are black will provide additional support.
Progress through the following stages, making the task increasingly difficult and moving toward independent spelling with each stage. Pair with word stretching (segmenting) before beginning to spell. Time spent on each stage will vary. Ensure that your child is working independently at each stage before moving on. At each stage, begin with modeling and prompting and fade until your child can do it on their own. Begin with #1.
- Begin by providing the word ending ( ex. _____ at). Provide 2 or 3 letters to choose from. Have your child listen for the beginning sound only and add it to the word.
- Provide the first two letters in the word (ex. ca _____). Provide 2 or 3 letters to choose from. Have your child listen for the final sound only and add it to the word.
- Provide the beginning and final sound (ex. C _____ t ) and have your child listen for the middles vowel sound. Provide two vowel choices, beginning with vowels that have more distinct sounds (ex. a and i rather than a and e)
- Provide all three letters needed to spell the word (mixed up).
- Include two additional consonants so that your child has to decide which sounds they need (rather than just putting three letters in the correct order.) At first, provide letters with more distinct sounds (ex. n and t), then move to sounds that are similar (ex. n and m).
- Include an additional vowel along with the two additional consonants.
Incorporate digraphs and blends once your child is confidently and independently spelling CVC words. Digraphs should be presented as one unit because they represent one phoneme, while blends retain their individual sounds (as in jump, fast, step, trip). It is more difficult to hear each sound, so your child may require more practice with segmenting blends. Try starting with words containing the same blend in the same position (for example: slip, slid, slam, slot, slim, slug, slat, sled). Use the visual with four places found here.
Apps:
Preschool University Sound Beginnings
